How to Build a Beautiful DIY Water Feature

Don’t you just love the look and sound of a beautiful, peaceful water feature? Same… but they can be expensive! That’s where this DIY water feature tutorial comes in.
I wanted to create my DIY water feature to look like a pot with water filling it. My vision for this project changed a couple of times while I was completing it, which is how it usually goes with the projects I do. But I always end up loving the final result! This time was no different. It looks sooo good!
Supplies Needed:
Note: This post contains affiliate links. I may earn a commission at no extra cost to you.
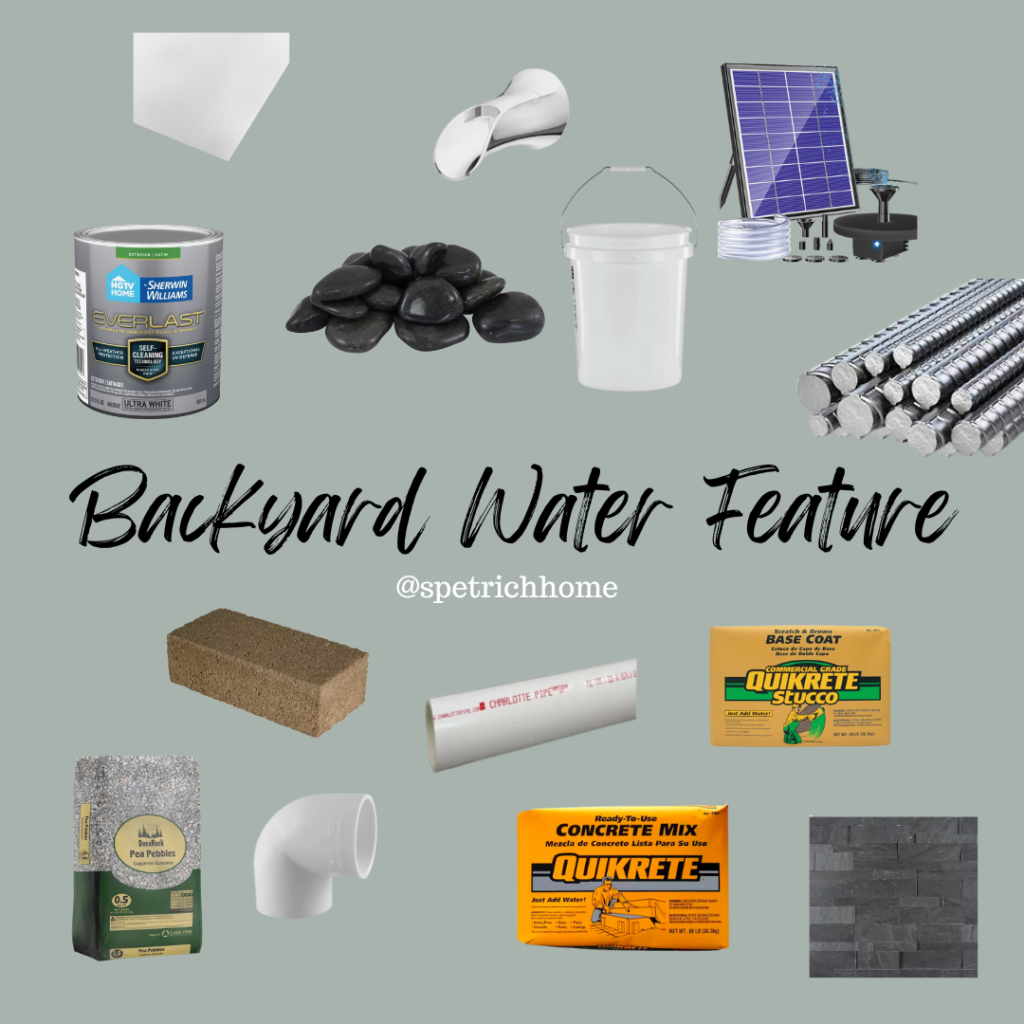
- Concrete
- Concrete Form (I used this plastic utility panel)
- Rebar
- Cinderblocks
- Pea Gravel
- Stucco
- Stone Tile
- Silicone
- 5-Gallon Bucket
- Paint (Ideally specifically for outdoor projects)
- Mortar
- Bricks
- PVC Pipes
- PVC Elbow
- Solar-Powered Water Pump
- Bathroom Faucet
- Decorative Rocks
You can get almost all of these supplies at your local hardware store!
Something important to note about creating your DIY water feature is that we will do a lot of jumping around on it. The order things should be done is kinda all over. Also! This is not the order I did it in when I made my water feature. I learned so much while doing it, so I am going to give you the directions in the order I would do it if I did it again. Sound good? If you watch the videos and get confused, just stay with me. Okay?
Step #1: The DIY Water Feature Pot
First, the pot. I could not find a premade pot that was what I was envisioning, so I made one myself. I had no idea if it would work, but I was really hopeful! Thankfully, it worked! I got a plastic utility panel and formed it into a cylinder. I glued it together, then taped it so it would stay while the glue dried.
Next, take a few pieces of rebar, about the height you want the pot to be. Hammer each piece about one foot into the ground in a circle inside the plastic cylinder. I added pea gravel to the bottom of the plastic cylinder form to help hold the concrete in place.
Now it’s time to start mixing up the concrete. Initially, I used a bucket and drill with this attachment to mix the concrete, but that was taking too long, so I switched to a Rubbermaid tub and shovel. I filled the bottom half of my custom pot with concrete, making sure it was spread evenly.
Step #2: Beginning the DIY Water Feature Tower
As you will see in the video, I started with the tower just one cinder block wide. I later decided to do it two wide, because it was more proportional. I suggest you just lay them two wide from the beginning. Laying them brick style will make the tower a little more sturdy.
Start by hammering two pieces of rebar about a foot into the ground. Lay the cinder blocks three high, positioning the rebar through the centers of the cinder blocks. I stopped the cinder blocks about one brick higher than where the concrete in the pot ended.
To accommodate the water pump, I placed a bucket in the concrete where I wanted it to go. I drilled a hole through the side of the bucket, the plastic sheeting, and the top cinder block. You will need a special masonry drill bit to drill through the cinder block.
Then, I fed a PVC pipe through the hole and secured it with silicone. This PVC pipe will house the tubing for the water pump.
Step #3: Completing the Pot and Tower
With everything in its place, I filled the rest of the cylinder with concrete. Once it was dry, I removed the plastic sheeting. I was amazed at how well it held! I attached a PVC elbow where the pipe passed through the cinder block and ran more PVC pipe up the back of the pot.
Lay the remaining cinder blocks so the tower is the height you want it to be.
Step #4: Pumping Life into Your DIY Water Feature
Time for the exciting part: installing the water pump! I enlisted some help from my mom. We made sure everything was correctly set up, and when we turned on the pump, we watched our water feature come to life!
Step #5: Adding Custom Touches
To make my concrete cylinder look more pot-like, I put a layer of bricks around the top. Then, I covered the entire surface with two layers of stucco and painted it black for a polished look.
For the cinder block panel, I enhanced its aesthetics by tiling it with pretty stone tiles (similar ones linked).
Step #6: Wrap Up Your DIY Water Feature
Now for the finishing touches! I used a bathroom faucet for the water outlet (I used the shower head for my shower, and saved the faucet for this project), painted it black (see this blog post on how you can paint a bathroom faucet to last), and installed it according to the instructions.
The last few things were to finish up the tiling, fill the pot with water, place decorative rocks on top, and turn on the garden water feature I’ve always dreamed of. It’s the perfect addition to my garden and I can now enjoy the soothing sounds of flowing water!
Follow along for more DIYs and fun at…