DIY Floating Corner Shelf: Simple Steps to Add Style to Your Space
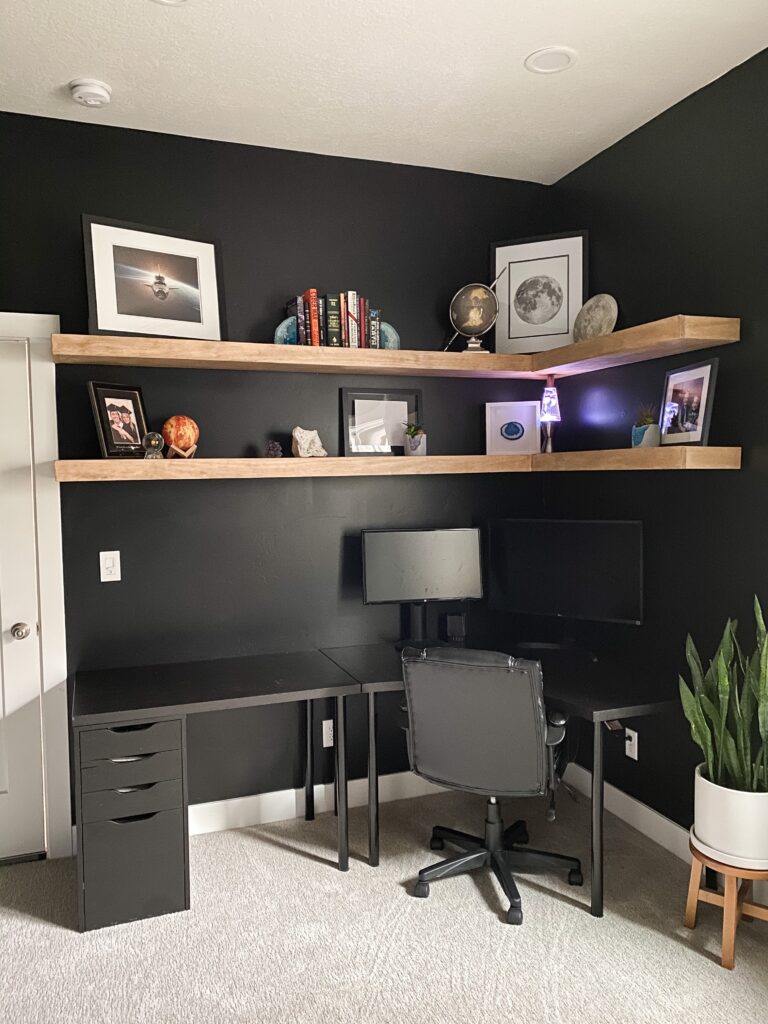
I recently made over my husband’s office. If you missed the first thing I did, go back and check it out HERE. It’s the coolest light-up accent wall! The other thing I did in that room was make a DIY floating corner shelf. I actually made two! They were a labor of love, but my husband loved them, so it was totally worth it. The shelves were not difficult, but they are big and a bit time-consuming to make. But overall, not too bad! You can make these yourself. Follow along to learn how!
Note: This post contains affiliate links. I may earn a commission at no extra cost to you. Thanks for supporting my content!
Supplies:
- Common Board
- Screws or Nails
- Wood Filler
- Wood Glue
- Sandpaper
- Stain
- Polyurethane or Polycrylic
- Bracket
Tools for DIY Floating Corner Shelf:
DIY Floating Corner Shelf Step #1: Cut & Measure
The first thing you will do is decide how big you want your shelves to be. Then, cut the wood to size. You can use a sheet of plywood and rip it down to size on a table saw. However, I wanted the shelves to be about 12 inches deep, so I used the common board that is already 12 inches. All I had to do was cut it to length. It saved me a little time.
You will need to cut two pieces PER SHELF. In my case, because I was making a corner shelf, I cut two smaller pieces and two larger pieces per shelf. I was making two shelves, so I cut four smaller and four larger. Then, miter the ends. Take note of which side of the wood you want exposed and cut accordingly.
Next, cut the side pieces. I made mine about 4 inches tall. So I cut the wood to be 4 inches by the length of the shelf.
Step #2: Assemble
Start by connecting one long piece and one short piece of wood at 45-degree angles to form the corner. Repeat this for both the top and bottom of each shelf. Because I am making two shelves, I did this four times. Then I added a bead of wood glue to the edge of the 12-inch piece. Secure it to the back of the 4-inch piece with screws, pocket holes, or nails. Ensure it lines up evenly.
I decided I wanted to attach the top to the side with pocket holes, but that’s not necessary. You can just screw them all together.
Repeat for the second 12-inch piece to the bottom of the 4-inch piece. You should create a U shape.
Step #3: Wood Fill, Sand, & Stain
Once everything is secure and dry, it’s time to “clean it up”. If you will be staining the shelf, you will want to find a wood filler that is similar to the color of your wood. OR you can make your own wood filler by using wood glue and sawdust from the wood you cut. Mix them until they form a paste and use that to fill the holes.
Sand it down with a 200-grit sandpaper, then use a cloth to wipe it clean. Make sure there is no extra dust on the shelf.
Now you can stain it!! Make sure to spread the stain in the same direction as the wood grain. Once the stain is dry, I recommend adding a clear coat. I prefer a polyurethane or polycrylic. Apply 1-2 coats.
Step #4: Install the Anchors
You can build your own anchors out of wood, but for this project, I got THESE braces from Amazon. I used my long level to draw a straight line where I wanted the shelf to go. Next, I used my stud finder and marked the studs.
Then, I used the hardware that came with the anchors and installed them on every stud along the line the shelf would go.
Step #5: Hang the Shelf
The best thing about these anchors is that you do not have to secure the shelf to them. All you do is slip the shelf over the anchors, and you are done. The shelf is super secure and holds a good amount of weight.
Step #6: Decorate Your DIY Floating Corner Shelf
This is the fun part: accessorizing the shelves. I found a few fun things at Home Goods, then set up my husband’s desk and invited him in to check it out! I think he loved it, so I am calling this project a win!
Follow along for more DIYs and fun at…