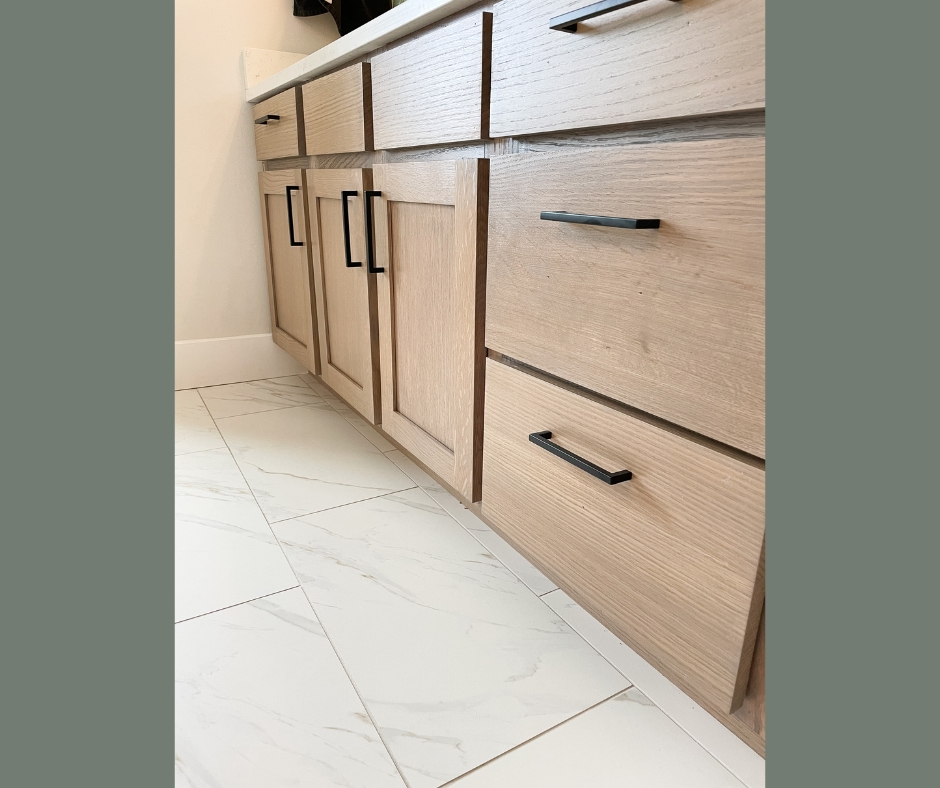
DIY Bathroom Vanity Makeover
Sure, my husband looked at me like I was crazy when I announced I was going to change a perfectly functioning bathroom. But the result is A-M-A-Z-I-N-G! I absolutely love the way this DIY Bathroom Vanity Makeover looks, and I am so glad that I put in the long hours to make it how I wanted it. I’ve put together this post to show you how it all worked out, and how you can do it too!
Note: This post contains affiliate links. I may earn a commission at no extra cost to you! Thanks for supporting my content.
DIY Bathroom Vanity Makeover Supplies:
- Drill
- Wood for Face Frame (I linked white oak because the red oak I used is now sold out at Lowe’s. However, I’m sure you could find it at another store!)
- Cabinet Side Panels
- White Oak Doors and Fronts from Cabinet Door Store
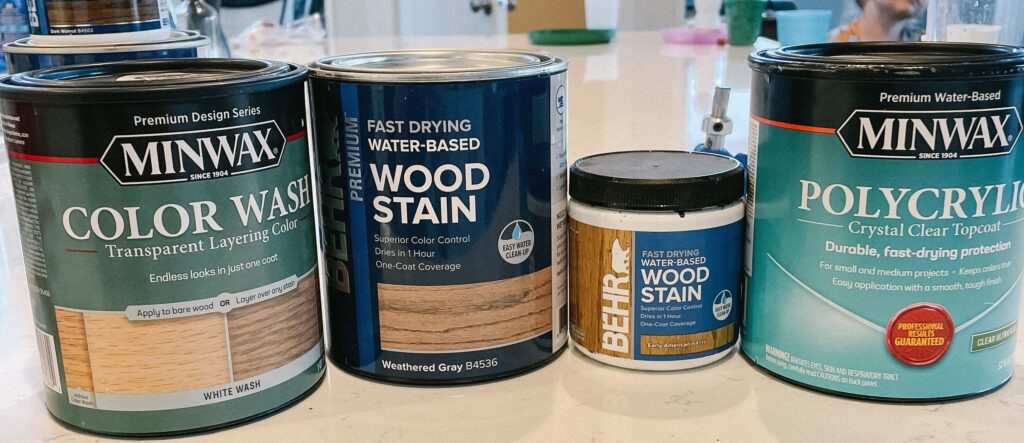
- Stain (I used a combination of White Wash, Early American, and Weathered Gray)
- Polycrylic Top Coat
- Wood Putty
- Hardware & Installation Tool
- Hinge Jig
DIY Bathroom Vanity Makeover Step #1: Remove Doors & Drawers
First, take off all the existing doors and drawer fronts. All you need for this step is a drill! Just unscrew those doors and drawers. If I could have sanded this vanity down and stained it, I would have. The doors that came with the house are made from a type of laminate and can’t be stained. So I opted to buy new doors and drawer fronts. If your doors and drawer fronts are wood and can be stained, it would save you money just to reuse them.
Step #2: Add the Face Frame to the Vanity
I thought that I could just paint the original vanity frames to match the color I wanted them to be. So I tested out the primer on the backs of my drawer fronts first. Spoiler alert: It didn’t work out like I wanted, so I went with my backup plan, which was to get more red oak panels and cover them with that. I cut the face frames to the length I needed and then attached them to the vanity using my brad nailer. Then I attached the side cabinet panels using wood glue and my brad nailer.
Step #3: Putty the Holes
You can get tinted wood putty in different colors to match the stain you’re using. I went with a classic gray to go with the stain I chose. Just put the putty on all of those nail holes and on the seams where the corner pieces meet.
Step #4: Stain Everything
I chose to stain all my pieces at varying times. First, I stained my new cabinet doors and then stained the rest as I went along. You can decide if you want to do it that way or just stain everything all at once. If you want to do it all at once, now is the time! I used a combination of different stains to get the color I wanted. My best guess is that I did about 20% White Wash, 40% Weathered Gray, and 40% Early American. Then I sealed everything with a top coat finish.
Step #5: Drill Hinge Holes in New Cabinet Drawers
You can definitely have them drill new holes when you order the cabinet doors. I had them leave it so that I could match the holes on the old doors to have everything line up perfectly. I used a hinge jig to drill new hinge holes in the doors, and just measured where the old ones were. Then, I drilled them in the same spot on the new ones. It worked out pretty well!
After the hinge holes are drilled, you can go ahead and attach those hinges. I did have to adjust mine a bit because of the extra wood I added to my vanity. There’s a little screw on the hinges that allows you to make the adjustments if you need.
Step #6: Install Hardware
Adding hardware to your vanity not only makes it look nicer, but it also helps the finish to last a lot longer. The oils from your hands break down the finish so much faster than if you used handles. Using hardware helps to eliminate some of those oils touching the handles instead of the cabinets.
I love the modern look of this black hardware. I’ve used these for multiple places in my house because they’re my favorite! The little tool that comes with this hardware is so helpful to make sure all of your hardware ends up in the right place on your doors and drawers.
Your DIY Bathroom Vanity Makeover is Complete!
And that’s it! Sounds so easy, right? It did take me a little bit longer than this because I actually have two vanities in my master bathroom, so I had to do everything here twice. But it was definitely worth the time and effort for this project! I love the way it looks.
Yes, the old vanities were fine, but this is definitely more my style, and it brings me joy whenever I look at it. Check out the other updates I’ve made to my primary bath, like this DIY tile backsplash! And be sure to follow me @spetrichhome for more DIY home projects!