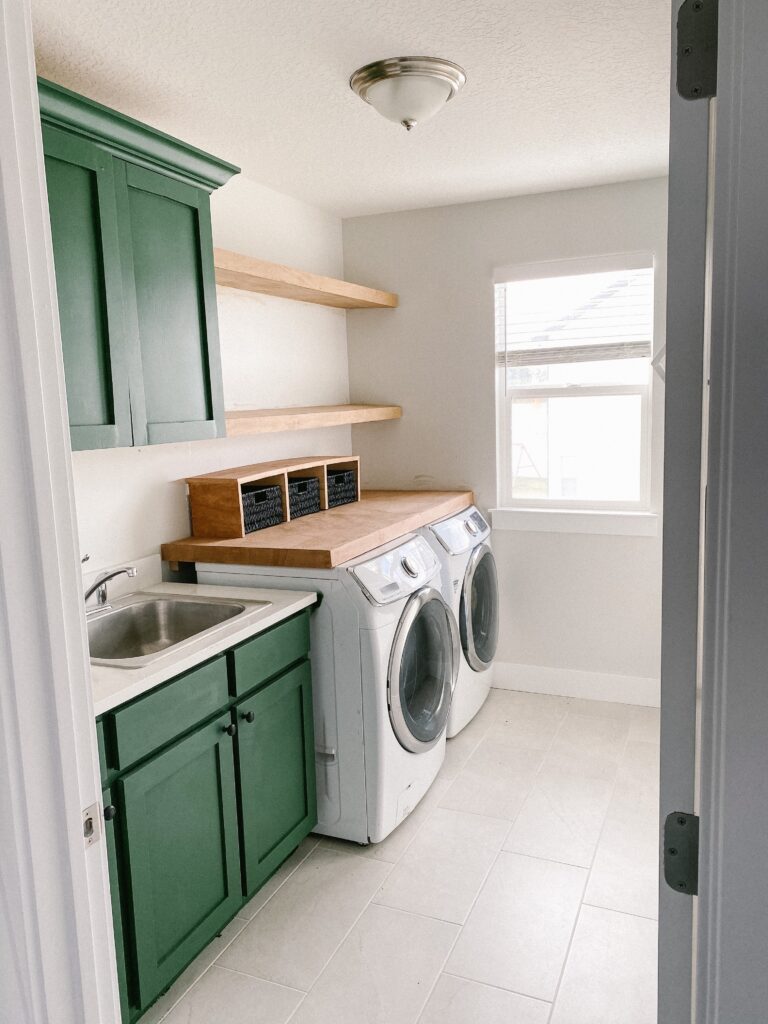
Laundry Room Makeover
We had a perfectly functioning laundry room until we found a leak. And where we found water, we also found mold. While I was in the process of getting it cleaned up, I decided to do what any normal person would do and renovate the entire laundry room! I never regret changing a room to better fit my style. It brings me happiness whenever I look at it. If you want to change something up in your house, do it! It will always be worth it. Follow these steps for your very own laundry room makeover!
Note: This post contains affiliate links. I may earn a commission at no extra cost to you. Thanks for supporting my content! 🙂
Laundry Room Makeover Supplies:
- Stock Cabinets
- Drill
- Paint (I chose Evergreen Fog by Sherwin-Williams for the cabinets and used Tricorn Black for the window trim.)
- Sandpaper
- Paint Sprayer (I borrowed one from my parents, but this one has great reviews and is inexpensive!)
- Cabinet Hardware
- Soft-Close Hinges
- Light
- Mussel Bound Adhesive Tiling Mat
- Tile (I chose Satori Bianco Dolomite 12×12 from Lowe’s)
- Laser Level
- Tile Cutter
- Grout
- Grout Float
- Removable Wallpaper
- 1×6 Primed Board for the Window Trim
- 1×4 Primed Board for the Window Trim
- 1×2 Primed Board for the Window Trim
- Nail Gun
- Caulk
- Caulk Gun
- Spackle
Laundry Room Makeover Step #1: Fix the Drywall
Since we had water leaking in our bathroom and it ruined the drywall behind the washer, we had to repair that first thing. It is always worth it to me to hire someone out to fix it. They are so fast, and then I can move along to what I really want to do.
Step #2: Install Cabinets
I built my own cabinets the first time I did this laundry room. They were fine, but I wanted the cabinets to go all the way across the length of the room. So I had my brother pick up some stock cabinets from Lowe’s, and away we went! We took down the old cabinets that I built and installed the new ones.
Step #3: Paint
I did a pretty good job painting the first time around with this laundry room. But I knew that this time, I wanted it to be more durable and have a little nicer finish. So I decided to take some sandpaper and lightly sand all of the cabinets before priming. It just helps the primer, and ultimately the paint, to stick better to the cabinets. When I was finished with that, I decided to use a 400/500 grit sandpaper to sand the cabinets just to get them super smooth. Make sure to use a clean cloth to wipe off all that dust!
I wanted to use the paint sprayer to get a smoother finish, but it is so cold here in the winter that I needed some additional paint supplies. My mom and dad own a painting business, so they have all of the supplies for me to borrow. I used a tent, some heaters, and a paint sprayer. My brother came and helped set everything up.
I love the finish that a paint sprayer gives, but man, it is a lot of work to prep the area. The overspray goes everywhere. I took the doors off the cabinets and prepped the cupboards in the laundry room for paint. Meanwhile, in my garage, the doors to the cabinets were inside the tent, and the area was taped and tented off so I could spray quickly. I have a video that shows this process below.
It’s not uncommon to get drips when you paint. You can fix the drips! Just get a really fine sandpaper, 500 grit or more, and get it wet. Then you just sand the spot until you see the drip disappear. You shouldn’t need to touch it up after you’re done, but you can add more paint if you feel the need.
Step #4: Add Cabinet Hardware
After everything is painted, it is time to install the hardware. I opted for soft-close hinges, and they are so easy to install. If you already have hinges and you want to swap them out, you literally just put them in the same place as your other hinges. Your old hinges should have the number on them that shows how much overlay is needed. Mine was 1-1/4″ overlay. The video below explains this in more detail. 🙂
Once you install the hinges (if you want), you can attach the cabinet pulls. It’s such a good idea to put handles on all of your cabinets. The oils in your hands will break down the paint much faster than if you were to use handles. They make a handy little cabinet template tool that shows you exactly where to drill for your handles. You just measure how long your handle is, and then use those holes on the template to mark it on the cabinet. There is a separate tool for drawers. After you mark it, you can drill a spot for the screw to go. Then you just attach the screw to the handle!
Step #5: Install Tile
Next step in this laundry room makeover is to tile! The hardest part of tiling was picking out which tile I wanted! I went to a couple of different stores and bought some samples to hold up to see which one I liked best. This one was the winner! I used my tile cutter to make the tile fit the space.
For this project, I am using Mussel Bound. It’s a double-sided adhesive tiling mat, and I love working with it. It’s easier for me to use than mortar, but you could use that too. I put all the Mussel Bound up where I wanted the tile to go. Then I started laying my tile. I definitely recommend using a laser level. I did not use one and ended up ripping off some of the tile because it wasn’t level. But I fixed it and it’s great now.
Step #6: Grout
The next step is to grout the tile. You will need a grout float to do this, but some people prefer to use their fingers and really smash in the grout well. My preference: Doing small sections at a time because the grout dries fast, and it’s easier to wipe off the excess when it’s still wet. I got a couple of questions about what to do where the tile meets the wall. In this case, I just used grout to fill the space in between the tile and the wall since it’s flush. But I know that when tile is exposed on an outer wall, you can buy trim pieces that go on the wall before you tile that part.
There were some questions as well about using a sealer when you tile. I knew that since this area would not be seeing a lot of water, I didn’t need to seal the tile. If you’re using tile in a bathroom or kitchen, though, it would be worth it to seal it. Fortunately for me, the grout also has a tile sealer in it.
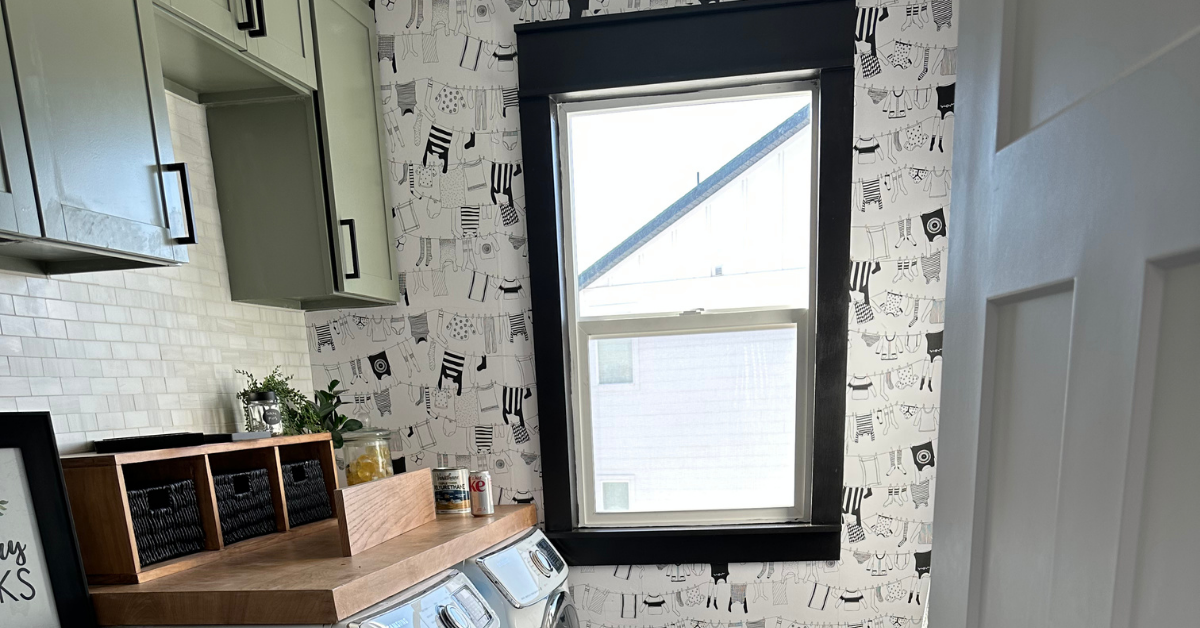
Step #7: Trim the Window (This Made Such a Difference in Our Laundry Room Makeover!)
When I built my house, the builder made all the window trims look so plain. I wish I had had them just leave it finished with the drywall. So I decided to take off the boards they had on and frame out the window how I wanted. I feel that it makes the window look so much nicer. It’s amazing what a little wood and paint can do to transform the room. I have a whole blog post on how to add trim to your window here!
Step #8: Swap Out the Light
I don’t know how this style of light is still a thing in today’s world. When I started redoing this room, I knew that I needed to switch out this light. I picked this light, and I love how it turned out. Switching out lights is surprisingly easy to do and makes a big difference in a room. It’s so much brighter, too!
Step #9: Add Wallpaper
Removable wallpaper is genius! When you decide to change up a room, it’s easy to take down. There are different types of removable wallpaper out there, and they’re not all made the same. Check out my blog post on how to install peel-and-stick wallpaper like a pro!
Final Touches to Your Laundry Room Makeover
I also installed a shelf with hooks to hang laundry on, hung some new roman blinds, and put my washer and dryer shelf back on. Here’s a blog post on how to make a shelf for your washer and dryer!
And that’s it! I absolutely loved doing this project. It definitely took some time from beginning to finish, but the result was totally worth it. I love this room! Follow me on Instagram for more home transformation projects!