Your 4-Step Guide to Making a Faux Window that Looks Real
A few months ago, I was brainstorming ways to give my home’s exterior a refresh. Naturally, I turned to ChatGPT for some ideas! After uploading a picture of my house and asking my robot assistant for its thoughts, it presented me with this picture:

My immediate thought: YES. My second thought: Wait, I don’t have a window on my front porch…
Which led me to thinking: what if I did? And with that, my faux window DIY project was born. Keep reading to discover how you can make one too! I promise, it’s much easier than it looks.
Tools Needed
*Heads up: This post has affiliate links. Thanks for supporting my content!
- Plywood Panel
- Mirror Tiles (I like these or these, depending on the space you’re working with!)
- Frosted Glass Spray Paint
- Mirror Glue (Note: This glue can only be used for mirrors—it will eat through other materials)
- Brad Nailer
- Board and wood trim pieces can be purchased from Home Depot or Lowe’s
- If you don’t want to use wood trim pieces, you can also use this: Peel and Stick Edge Banding
Here’s the full list of products on my Amazon Storefront!
Step 1: Prep & Frame Your Board
First things first: Get a board or plywood panel to serve as the back of your faux window. I repurposed a sign from our front porch because it was the perfect size for the window I needed!
To start, I added some extra wood trim to the edges to make it look more like a real window. I attached the pieces using this brad nailer—the very same you can use to nail the grilles (the trim inside the window frame) down later! Which brings us to step 2…
Step 2: Add the Wood Grilles & Tiles to the Board
Begin laying the wood grilles and tiles out in your design of choice. Use your brad nailer to secure the longer horizontal pieces, then measure and trim the shorter vertical cuts, setting them aside for now.
Next, the tiles! I used this glue to attach the tiles to my board, placing a glue dot in each corner. After adhering the tiles, I nailed the smaller wood trim pieces in place.
Step 3: Spray the Glass
After the glue has had a couple of hours to dry, use painter’s tape to cover the wood trim and protect it from the frosted glass spray paint. Give the can a good shake, then start spraying each panel in a back-and-forth motion. You’ll likely need to do a couple of coats—I did two.
Let the spray paint dry, then remove the painter’s tape.
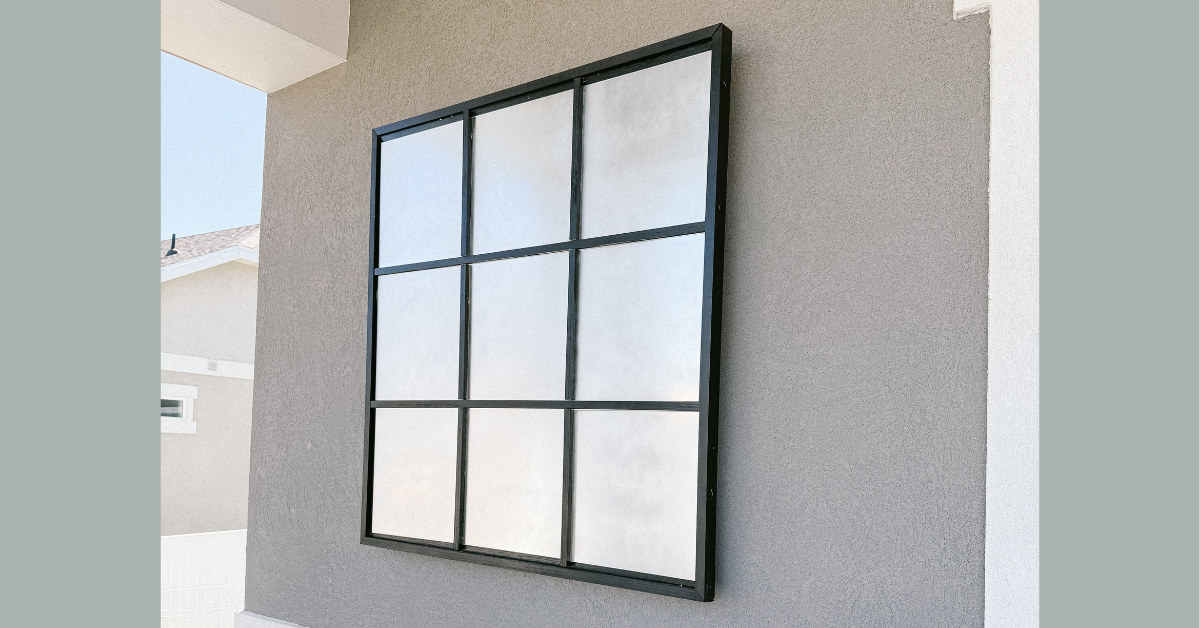
Step 4: The Finished Product
And voila! A window where there wasn’t one before. I love how this brightened up our front porch! And if you’re looking for other ways to add some extra curb appeal, click here to see my tips for painting a front door!
You can create a faux window for a space above a garage, an asymmetrical exterior section of your home… the possibilities are endless! Remember to use waterproofing spray and secure the faux window with extra support if you’re installing it in an area exposed to the weather.
Comment below and tell me where you’re going to put your faux window! I can’t wait to see the before and afters.
Follow along for more DIYs and fun at…


One Comment
Comments are closed.