DIY Concrete Pendant Lights
Once upon a time, I came across some concrete pendant lights online and fell in love with them. Then, I soon found out they were way too expensive for my taste, so I decided to make them myself! Follow along to learn how you can make your own DIY concrete pendant lights!
Note: This post contains affiliate links. I may earn a commission at no extra cost to you. Thanks for supporting my content! 🙂
DIY Concrete Pendant Lights Supplies:
- IKEA Pendants
- Primer
- Feather Finish
- Putty Knife
- 220-Grit Sandpaper
- Latex Gloves
- Paddle Attachment
- Bucket
- Paint
- Spray Paint
Step #1: Prime the Pendants
First, I sprayed the pendants with a bonding primer. Make sure to cover the surface fully!
Step #2: Mix & Apply the Feather Finish
Next, using a paddle attachment for my drill and a 5-gallon bucket, I mixed the feather finish with water. Be sure not to make the mixture too thick, or it will be too hard to spread. I wore gloves to apply the feather finish onto the primed pendants.
Step #3: Sand, Paint, & Repeat
When the pendants had dried (I let them try overnight), I sanded them with 220-grit sandpaper.
The color of the feather finish after drying was too brown for me, so I added a bit of black paint to the mixture and repeated a second coat. After the pendants were dry, I sanded them again.
Step #4: Paint the Inside of the Pendants
These pendants were going to hang over our kitchen island, which means you could easily see the insides. I decided to spray paint the inside of the pendants gray to match the concrete look of the outside.
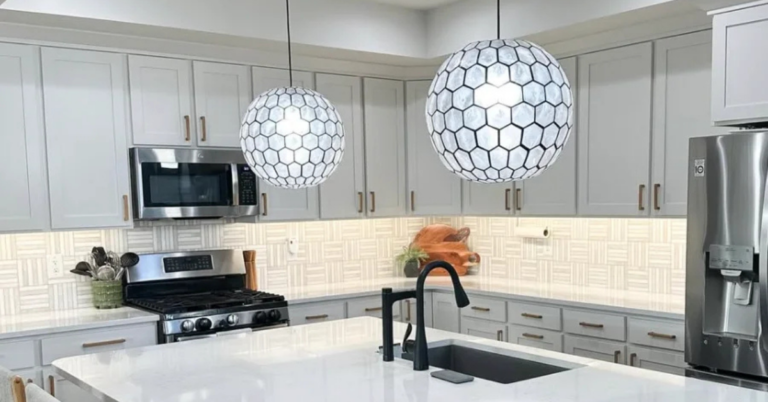
Step #5: Install Your DIY Concrete Pendant Lights
Last step! I installed them over the island in our kitchen, and they look like real concrete!