Easy DIY Planters That Transform Your Curb Appeal
Your front yard is the impression your home gives to the world. If you’re looking to improve your curb appeal and make some outdoor charm, these DIY planters are your ticket to a garden transformation that’s as much fun as it is fabulous. Now, I won’t sugarcoat it—this project might take a bit. But here is the best part: you can totally skip your gym session today because, believe me, all that hammering, digging, and moving cinderblocks will give your muscles more action than any gym workout ever could. So by building these DIY planters, you really are saving yourself time. It’s both a DIY curb appeal boost and a workout shortcut. You’re welcome!
Note: This post has affiliate links. Thanks for supporting my content!
DIY Planters Supplies:
- Gloves
- Disposable Gloves
- Cinder Blocks
- Mortar
- Rebar
- Pea Gravel
- Masonry Piping Bag
- Solid Cinder Block
- Stucco
- Paint
- Waterproofing Sealant
- Soil for Containers
- Paint and Mud Mixer for Drill
- Spackle Knife
- Sanding Sponge
First things first… GLOVES. When working with cinder blocks, mortar, shovels, or dirt, just use gloves. I promise you will thank me! These gloves have rubber on them, so it is easier to pick up and move the blocks. Use disposable gloves when spreading the mortar.
Work smarter, not harder: Get your cinder blocks delivered to your house, so you don’t have to load them up OR unload them. Sure, you may need to pay a delivery fee and possibly a tip, but think of the time and energy you will save!
DIY Planters Step #1: Add The First Layer
The first layer of blocks is the most important. And while it takes the longest and makes you question your life choices, it gets better. I swear! Your body may hurt, and it may feel like you got beaten with a ton of bricks (and you kinda did), but it is so worth it!
It’s very important that you make sure the blocks are perfectly level. This is your foundation to the entire box, and if it’s lopsided or unstable, the rest will look slanted and may fall over. Take the extra time to make sure they are level!
Once the first layer of blocks is set and leveled, place a piece of rebar in each hole of the cinderblocks. Hammer it down to be slightly lower than the height of your planter will be. Again, this is the foundation we are building, so it is a step that you do not want to skip.
Finally, fill each hole on the cinder block with pea gravel or concrete. I chose pea gravel.
Step #2: Start the Second Layer
Now that you are done with the first layer, the second and any other layers you do should go much quicker. If you’ve been here for a while, you know I choose to work smarter, not harder. That’s why I am using pre-mixed mortar to connect the cinder blocks! But you can also mix your mortar if you want to.
Any time I do brick work, I use these “piping bags”. Think decorating a cupcake, but with cinder blocks, not cake. It is so much easier and cleaner to pipe the mortar on the block.
Pipe around the top of the base block and place the next one on. Mortar will probably ooze out the side, but you can simply spread it along the seam to seal it up. Don’t worry, it does not need to be perfectly sealed.
Once the second layer is all set, fill the holes with pea gravel again.
If you need to add another layer on your planter, repeat step 2 until your planter is the desired height. Once it is high enough, move on to step 3.
Step #3: Close it Up!
Now that the planter is the desired height, we are going to close up the top. Get this kind of cinder block. Pipe more mortar on the top cinder block and place the “lid” on. Spread any extra mortar along the seam, and you are done with the build portion of the planter!
Step #4: Stucco the DIY Planters
In this step, we will seal all the cracks. So if the mortar did not cover every crack, it’s okay, because we are closing it all up now! Mix up your stucco according to the package, but only mix as much as you are going to use. You cannot save stucco until tomorrow… I learned that the hard way.
The best way to mix the stucco is with your drill and this attachment. It works just like a hand mixer that you use to beat your cake mix. (I think I should go make a cake!) Anyway, you will for sure want that attachment to mix your stucco, mortar, or concrete.
Once it is all mixed, it is time to apply it to the planter. Using a spackle knife, spread the stucco all over the outside, top, and inside of the planters, the same way you would spread frosting on a cake. Make sure it’s fully covering the cinder blocks. Heads up: It’s a little tricky getting the stucco to stay on the corners.
I also added the stucco on the inside top half of the planter.
Step #5: Sand the Stucco
Once the stucco was dry, I sanded it down to smooth it out. Stucco is rough and has a lot of sharp, uneven edges and texture. I did not like the look of that, so I sanded it down, and it looked so much cleaner. If you don’t mind that look, you can skip this step, but I am glad I did it.
After you’re done sanding, wipe the stucco off to remove the dust. You can even spray it off with the hose if you want, but make sure it is completely dry before you move on to the next step.
Step #6: Paint the DIY Planters
Time to paint the planters! I did two coats of Iron Ore by Sherwin-Williams. It may not have needed two coats, but I wanted to make sure it was completely covered, and I had the paint, so I just did it. You decide what your project needs!
I also painted the inside top half, where I stuccoed, so once the dirt and plants were in, it looked nice and finished.
Step #7: Waterproofing the Foundation
My planters are right up against the foundation of my house, so I decided to apply this waterproofing sealant to the foundation. I painted it on the bottom portion of my foundation, where I planned to have dirt. I did two coats of this as well, just for extra measure.
Let it dry, and you are ALMOST DONE!
Step #8: Finishing Touches on Your DIY Planters
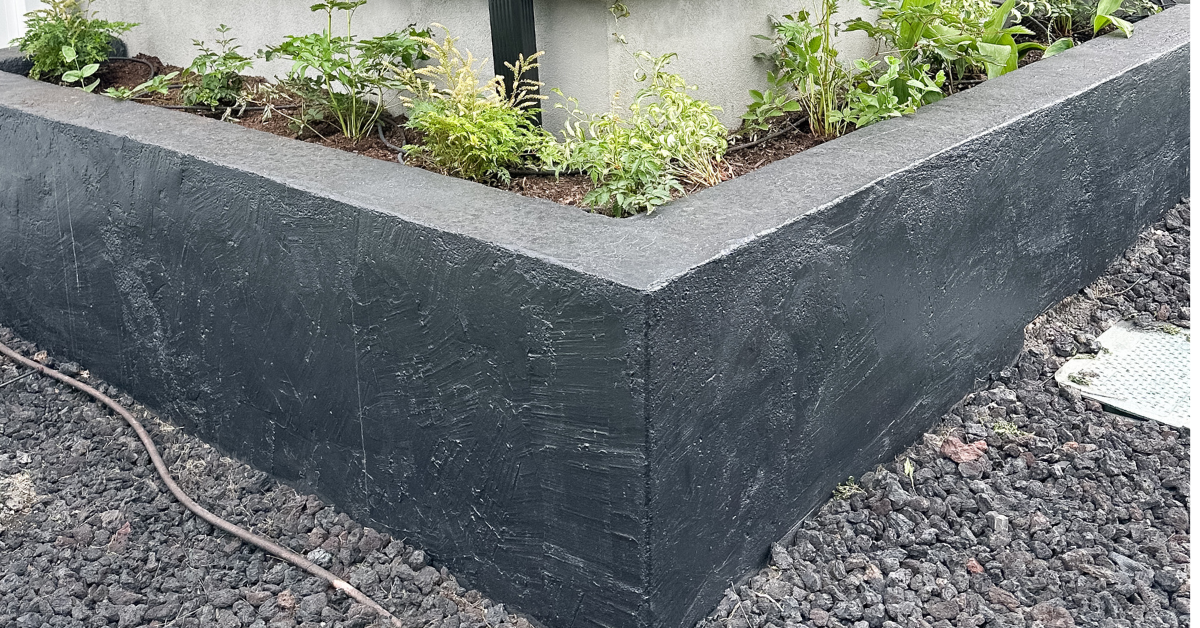
You are so close… just a few finishing touches to complete your curb appeal glow-up! I chose to add cardboard to the bottom of the planters. This made it so I did not have to use as much dirt, but also helped with weed control. I then added the dirt, which was so many bags, I lost count! We installed a drip system, which is totally optional, but will be super nice! Then I planted my plants, cleaned up a bit, and I now have these amazing planters in my front yard!
I LOVE THEM SO MUCH! They are perfect for the space, instantly improved my curb appeal, and they will be super low-maintenance! What do you think? Are you going to build some?
Follow along for more DIYs and fun at…

One Comment