DIY Christmas Greenery Arch
Greenery arches are expensive! Just like with my DIY gingerbread village, I fell in love with a few online, but wow… the price tags. So, of course, I decided to make my own DIY Christmas greenery arch. What I didn’t expect was how long it would take or how much greenery I’d end up needing. The cost kept creeping up, almost to the point of matching the ones I originally wanted. But in the end, I loved being able to customize it exactly how I envisioned. That’s the life of a DIYer: you never really know what you’re getting into until you’re knee-deep in garland and ornaments.
Anyway… here’s my take on a Christmas greenery arch! You can customize it to your space, and it works beautifully on a front porch (like I did) or indoors. Let’s jump in!
Note: This post contains affiliate links. I may earn a commission at no extra cost to you. Thanks for supporting my content! 🙂
DIY Christmas Greenery Arch Supplies:
*The supplies are completely up to you and what you’re envisioning! You may not need all of them, but this is what I used.
- Cedar Garland
- Pine Garland
- Eucalyptus Garland
- Garland Ties
- Gold Ornament Garland
- White & Gold Ornament Garland
- Nutcrackers
- Gold Paint
- Red Paint
- Paintbrushes
- Planter (I painted it and used it as a bell!)
- Pine Branch Stems
- White Ornaments
- Red and White Ornaments
- Velvet Bow
- Chicken Wire
- Metal Hooks
- Staple Gun
- Zip Ties
Step #1: Set Up the Frame
I tested a few different frame ideas before landing on a mix that actually worked: chicken wire attached to the wood pillars on our front porch with a staple gun, paired with metal hooks to hang the greenery from the top. Initially, I tried Command hooks, but that ended up falling—either from the weight of the garland or the chilly weather, I’m not sure. But if you’re doing this project indoors, Command hooks could be a great option!
DIY Christmas Greenery Arch Step #2: Add the Base Greenery
I vastly underestimated how much greenery this DIY Christmas greenery arch needed, which was part of why it took a little while to complete. Every Amazon order and trip to the store added days to the timeline, but I was after a specific look. So despite the wait, I was all in!
I used a mix of cedar, pine, and eucalyptus garland, and filled in any sparse areas with these pine stems. An Instagram follower shared this great tip: Use the cheaper-looking stuff on the base of the garland, then layer in the prettier greenery on top. That way, you still get a full-looking arch without spending as much on higher-quality greenery.
Step #3: Weave in Decorative Elements
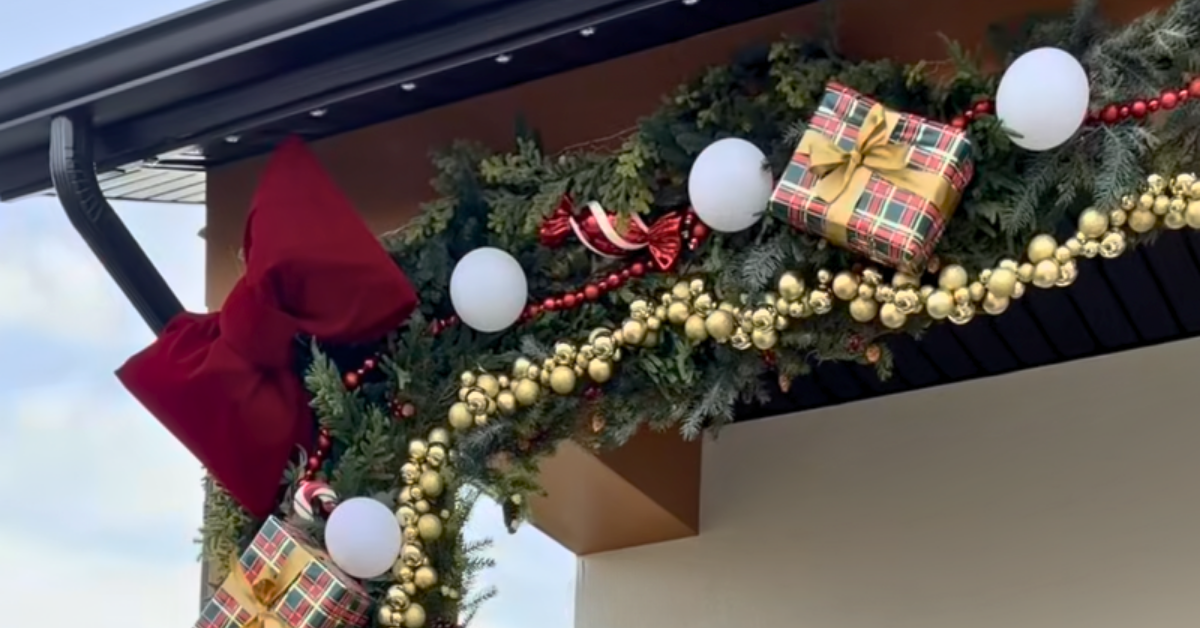
Once the greenery was in place, I started adding ornaments, ornament garlands, and a few other fun, whimsical touches. I painted some of the garlands red to contrast against the white and gold ones, then attached the larger ornaments individually.
Next, I placed a big red velvet bow in the corner of the arch and affixed some playful elements like a nutcracker and “presents” (empty boxes I’d wrapped) with zip ties. I also added a few “bells” to the mix, which were actually just planters that I painted gold. I think they look very convincing. 😉 Suddenly, I could see my hard work coming together and looking like the DIY Christmas greenery arch I had envisioned!
DIY Christmas Greenery Arch Reveal
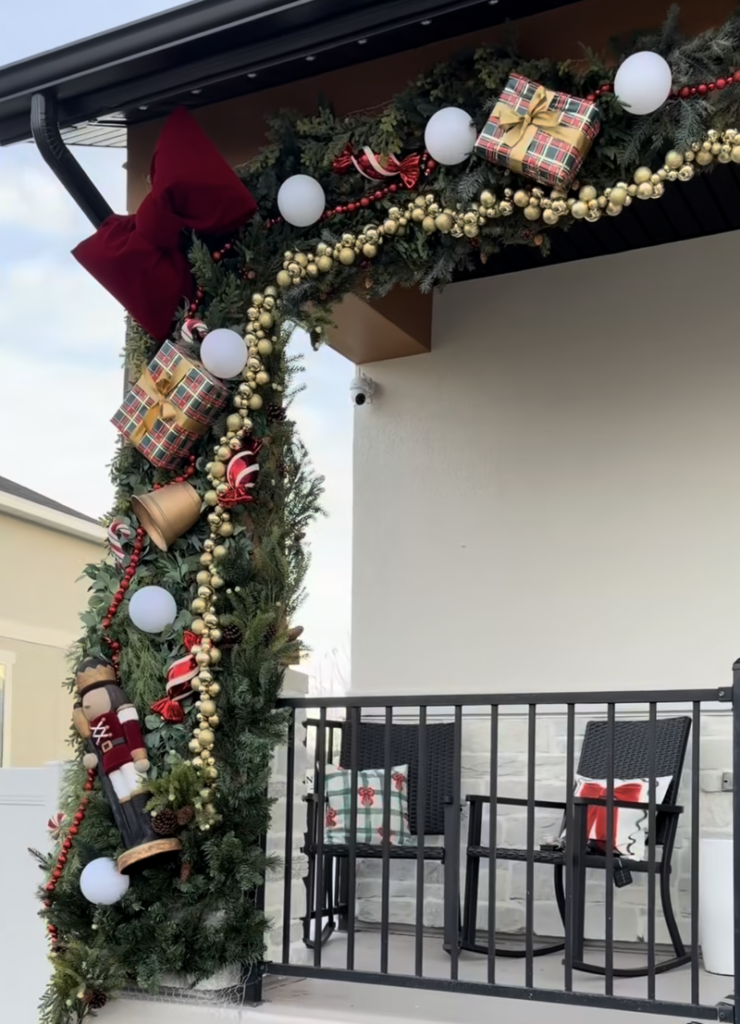
At last, it was done, and I’m so happy with the way it turned out! If you decide to build your own DIY Christmas greenery arch, where are you going to put it? Let me know in the comments!
Follow along for more DIYs and fun at…