Office Makeover Part 1: Custom Built-In Cabinets
This office makeover has been a long time coming! For years, I’ve wished for a place to dream up new ideas and gather inspiration for new projects. This space was so much fun for me to create, and I’m excited to share the steps I took to make it happen! Starting with (drumroll please…) custom-built-in cabinets! Here’s how I did it.
Supplies Needed:
This post contains affiliate links. I may earn a commission at no extra cost to you.
- Cabinets
- Cabinet Hardware
- 12 Ft Maple Butcher Block Counter
- Butcher Block for Shelves (I got mine from Floor and Decor, but they also have these at Home Depot and Lowe’s!)
- Cabinet Toe Kicks (The size will depend on your cabinets, but I got mine from Home Depot!)
- Drill
- Wood Conditioner
- Wood Stain (½ Behr Golden Oak and ½ Behr White Wash)
- Primer
- Gas Mask to Wear When Priming
- Shelves
- Shelf Pins
- Sandpaper
- Shiplap Wood
- Nailer
- Nails (For installing shiplap and arches)
- Jigsaw
- Caulk
- Putty Knife
- Wood for Arches (I used 3/4 in. plywood)
- Color match to cabinets is Pewter Green by Sherwin-Williams
Step #1: A Clean Slate for My Office Makeover
To start, I had to say goodbye to the existing geo accent wall that I installed a few years ago. I loved the design, but it wasn’t going to fit in with the vision I had for my new space, so it had to go!
Step #2: Assembling & Installing the Lower Cabinets
When I was dreaming up my home office, I knew I would want as much storage as possible. My larger tools live in the garage, but I needed the tools I reach for (almost) daily, like my drill and jigsaw, to be more easily accessible. These cabinets have plenty of drawer space for tools, project supplies, and all the office-y things. Sadie also realized that they had plenty of room for her. 😉
I thought that these cabinets came preassembled, but sadly, that wasn’t the case. Thankfully, putting them together didn’t take me too much time! After they were assembled, I secured them to the wall.
I painted the cabinet toe kicks for a more finished, professional look. I was able to find a nearly identical color match to the cabinets: Pewter Green by Sherwin-Williams. It’s such a gorgeous, rich shade of green!
Step #3: Finishing Touches for the Lower Cabinets
Up next: the counters, which in this case meant a 12-foot maple butcher block! I conditioned the butcher block with this, first painting a heavy coat, then letting it dry, sanding it, and adding an additional coat. Side note: We use our dolly a surprising amount, including for this project! It’s what we used to bring the butcher block inside, and our backs are forever grateful for it.
After conditioning the wood, it was time to stain it. I tried several different stain combinations, but ended up deciding on a 50/50 mix of Behr Golden Oak and Behr White Wash. I love how it turned out!


Once the counters were installed, it was time to add hardware. It’s no secret that I love minimal matte black hardware—I used very similar handle pulls when building my garage workbench. I installed the hardware using my Dewalt drill.
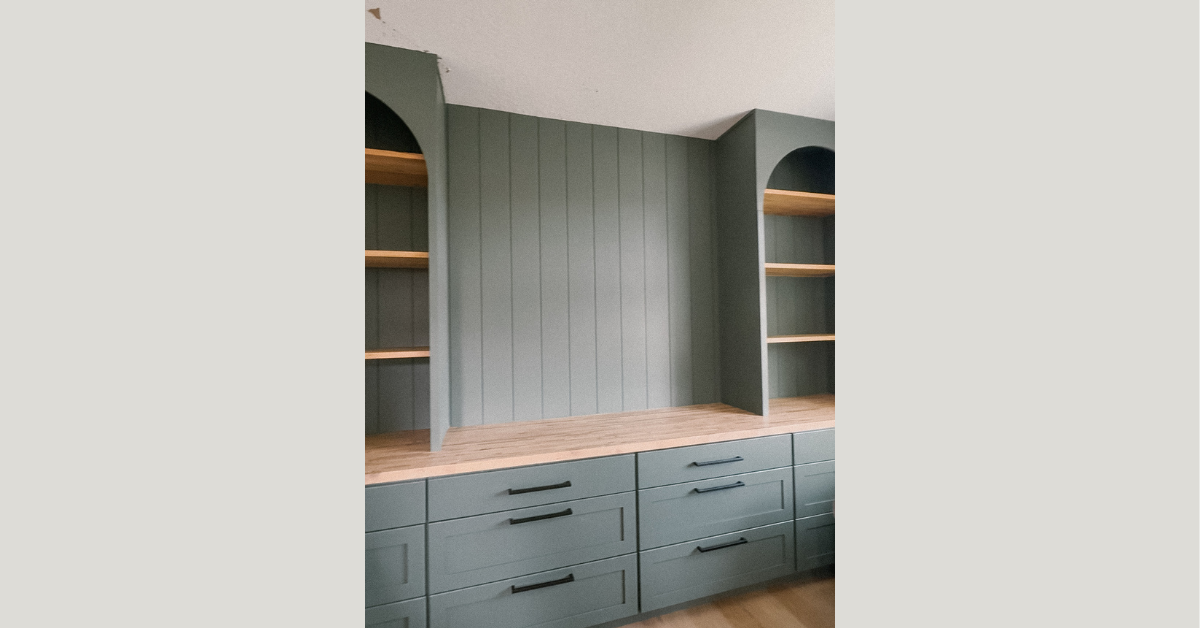
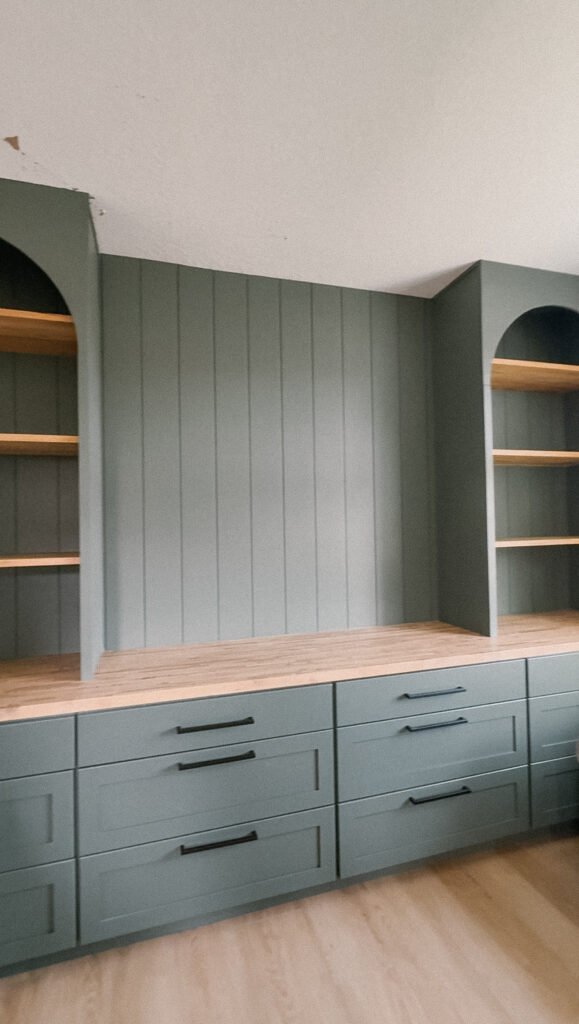
Step #4: Building Upper Custom Built-In Cabinets
You can never have too much storage space, so I added uppers to my custom-built-in cabinets next! After another trip to Lowe’s (AKA my second home) for wood, I cut them down to fit the space. I drilled pocket holes that lined up with the studs and secured everything to the studs and the butcher block.
The next step was to fill and sand any holes and imperfections in the wood for a smooth finish. After that, I primed the wood, which keeps orange tannins from showing through. I’ve learned the hard way that knots and grain will show through the paint if you don’t prime it, so I never miss this step. I wore a mask while priming to keep the smells out, because the scent of primer is truly one of my least favorite smells on earth. Yuck!
I let the primer dry, then sanded again using 220-grit sandpaper. Then, I painted the shelves to match the lower cabinetry.
Step #5: Installing Shelves
Adding the shelves was by far the quickest part of the cabinetry building process. I just placed these shelves on shelf pins, added wood conditioner, sanded them, and painted a final coat. They ended up matching the butcher block counter really well!
Step #6: Adding a Shiplap Accent Wall
I knew I had to add something special in the middle of the built-in cabinets for some extra visual interest, and I decided on shiplap. It’s such a timeless, versatile style, and very DIY-friendly.
I added the shiplap to the larger space in the middle and cut shorter pieces to go behind the shelves themselves. After cutting the wood, I painted the shiplap’s sides. This was annoying to do, but it saved me from having to do it when they were affixed to the wall. I installed the shiplap using my nailer, then caulked the spaces between the shiplap to eliminate uneven gaps.
Step #7: Adding Arches to My Custom-Built-In Cabinets
For the final element of my office built-ins, I added arches to the top of the bookshelves. I’m so glad I did! These really made them look complete. I measured the wood, cut it, and installed it using these nails.
The last few steps were to fill any holes in the wood, then sand, prime, and paint!
Custom Built-In Cabinets Reveal
I’m so thrilled with how these built-ins turned out! The contrast between the green paint and cedar stain, the arched accents, and of course, the storage… there’s so much to love! But I’m far from done with this office makeover. Keep following along for part 2, part 3, and part 4!
Follow along for more DIYs and fun at…


One Comment
Comments are closed.