DIY Secret Closet Door: Tips, Tools, & Materials You’ll Need
Have you ever had a project you wanted to do, but you were intimidated by it? You did not know where to start, how to do it, or if it was even possible? Well, that was me with this DIY secret closet door!
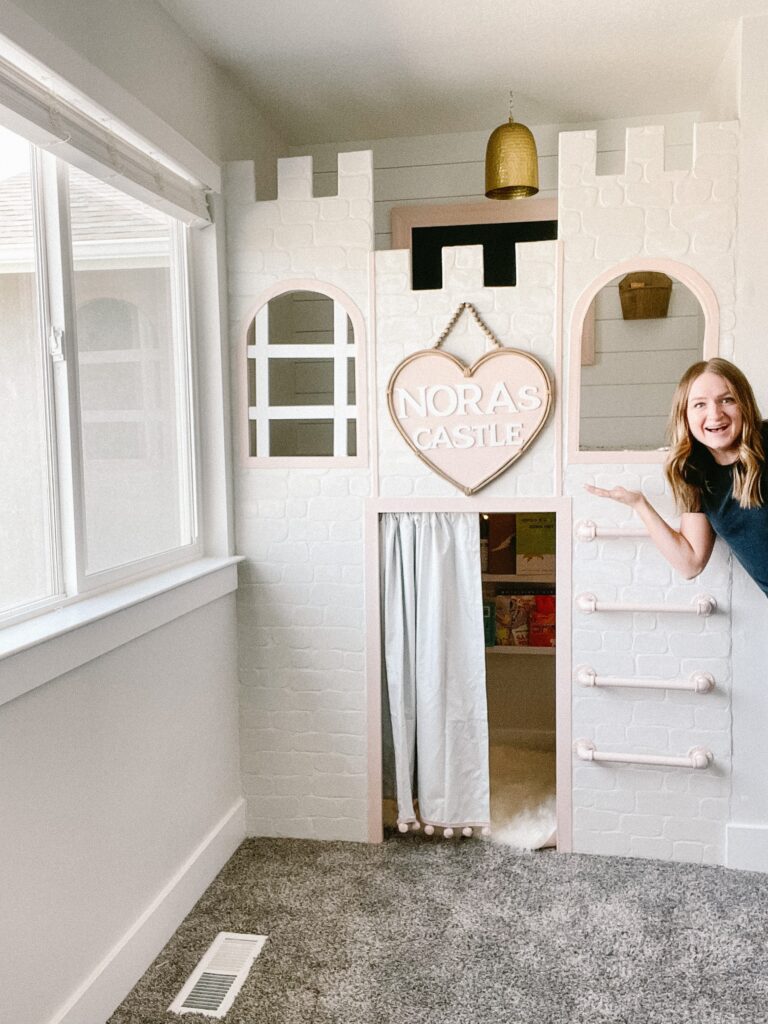
While I was building the inside of the closet, I thought it would be so fun to add a secret door to access the closet. When I looked up buying one, I found that the kits to build them were thousands of dollars. So in true Stephanie fashion, I thought, “I could build one for so much cheaper!” And while, yes, it will be cheaper, I was so intimidated by it. I had never built anything like this, and I had no idea where to start… so I just started, and it all worked out! Let me show you what I did!
Note: This post contains affiliate links. I may earn a commission at no extra cost to you. Thanks for supporting my content!
Supplies Needed:
- 1×6 Frame
- Hidden Door Hinge
- Pocket Hole Jig
- Bondo
- Multi-Tool
- Chisel
- Drill
- Shiplap
- Primer
- Paint
- Paintbrush
- Caulk
- Wood Filler
Step #1: Remove the Existing Door Frame & Patch It
I wanted to try to use the existing door frame instead of having to buy a new one. This required me to carefully remove the door and trim. I used spackle to fill in all the holes and imperfections. It worked, but Bondo would have been better. You can use either.
Once that was all dry, I sanded it all down. Make sure it feels smooth to the touch. Any imperfections you can feel will be magnified when you paint it. You may need to do a few coats of mud and sanding, but it’s worth it. Do not rush this step.
Step #2: Determine the DIY Secret Closet Door’s Dimensions
You need to figure out how big your door should be to clear the door frame on all sides. To do that, I took a piece of wood that I was going to use and put it on the floor. Then, I moved it to the open and closed position to ensure that it did not hit the wall on any side. After that, I cut the top and bottom pieces to the same size.
Step #3: Fill the Gap on Top of the Door Frame
Typically, doors have a gap around them. This allows for movement when installing them. You will need to fill that gap on the top because your hinge will need something to secure to, and if there is a gap, it will not be very secure. So I just used some scrap wood and filled in the gap. I secured it with screws and ensured it was level.
Step #4: Add Hinges

I’ll be honest, this step was tricky! I wanted the hinges to sit flush on the top of the door frame, so I used my multi-tool and chisel to remove part of the door frame to allow the hinges to sit perfectly inside the frame. This was complicated, time-consuming, and difficult, but I did it, and it worked!
I installed the hinge directly on the top and bottom boards in line with where the other half was, and where the door needed to go/open.
Step #5: Assemble the DIY Secret Closet Door
You should already have the top and bottom pieces of the door. Now it’s time to measure and cut the sides. Determine what size you need them and cut them to be the same. I used pocket holes, but you could absolutely do without them and screw through the sides of one piece into the other. Here, you are basically making a frame.
Once you have your frame, attach it to the hinges. Keep in mind, you may need to re-adjust a few times. You may need to recut it if the measurements are not right. That’s okay—we have never done this before. Just keep going, you will get it!
When you get it on the hinges, test it out and make sure it opens and closes correctly! It’s so cool!
Step #6: Add the Back
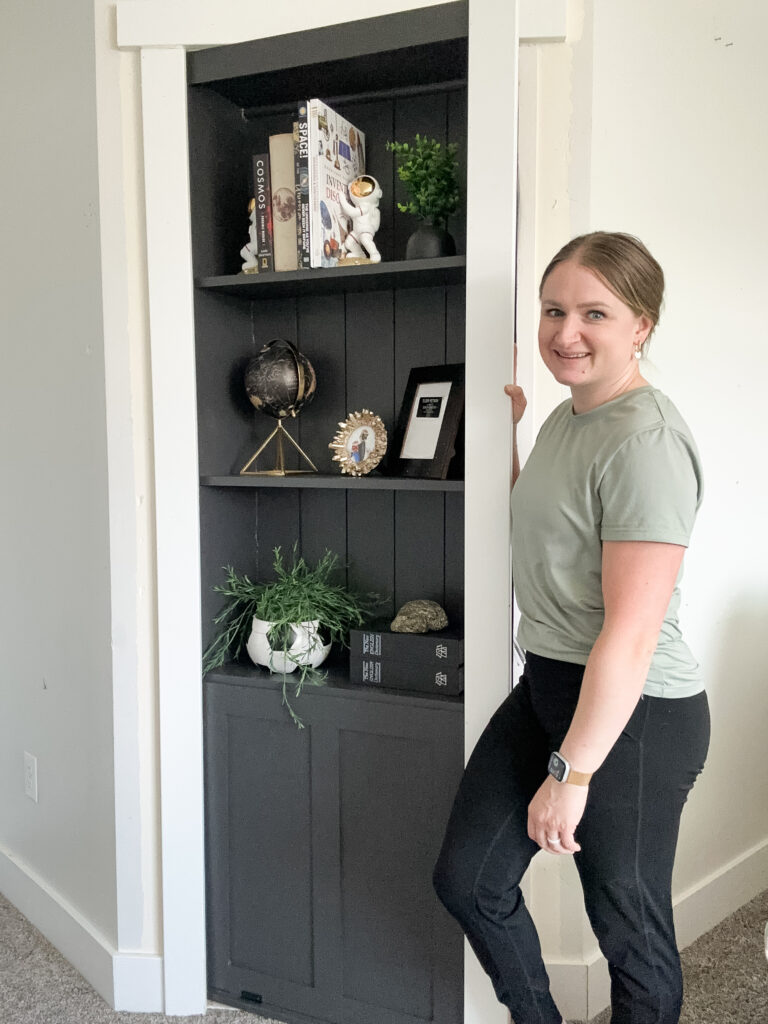
I chose to use shiplap for the back. I thought it would add a fun touch, plus I already had some in my garage!
The shiplap needs something to attach to. The frame would have been fine, but I did not think it was going to be big enough. So I added a piece of trim to the top and bottom.
Then, just start attaching your shiplap like normal, only securing it to the top and bottom and the two sides.
Step #7: Install Shelves
Measure and cut your shelves to size. I installed these with pocket holes, too. Determine where you want your shelves and make sure they are level as you secure them. Repeat until all your shelves are installed.
Step #8: Add Trim
I was able to reuse the trim that was already on the wall; I just moved it in a bit. To install it, I attached the top and side the hinge was on to the wall, and I attached the side that opens to the door. This not only acts as trim to make the door/seams invisible, but it also gives you something to hold on to to open the door.
Step #9: Do the Finish Work
Time to do all the tedious work. Put the baseboard back on, caulk, wood fill, sand, and prep it for primer. I say this every time, but it’s so important not to skip this step. It can be so easy not to do it, but it really takes the project to the next level. So take the time and just do it, and make sure everything is smooth.
Step #10: Prime & Paint Your DIY Secret Closet Door
You did it! We’re at the last step. It’s time to prime the wood. Remember, if you are ever painting raw wood, it is so important that you use a primer before painting it. Not a paint+primer, but a primer. I recommend priming it once, then sanding it with 220-grit sandpaper. You can then either repeat that (primer and sand one more time) or you can paint it. Either way, be sure to prime it!
Then, I finished it up with some paint! I decided to paint the back (since it was inside the closet) and the shelf/door. I did not paint the trim; I left it white. My boys LOVE how it turned out and think it is so cool that they now have a secret door to their closet!
To keep things from sliding off the shelves, I secured them with this gel. It’s such a genius product and can be used in so many ways!
This project definitely challenged me, but it is so fun to figure out new projects and new things. I love the way it turned out, and now it is time to start on their loft beds!
DIY Secret Closet Door Decor


Follow along for more DIYs and fun at…