How to Make a Spooky Halloween Tree for Your Yard
It’s no secret that I love decorating for Halloween (and for any holiday, really 😆)! After completing my pumpkin arch, my front walkway still felt a little empty, so I decided to create a Halloween tree to complete the spooky vibe. Follow along as I walk you through how to make this outdoor Halloween decoration that’s sure to impress trick-or-treaters and neighbors alike!
Note: This post contains affiliate links. I may earn a commission at no extra cost to you. Thanks for supporting my content! 🙂
Halloween Tree Supplies:
- Tree Branches
- Fast-Setting Concrete
- 5-Gallon Bucket
- Black Spray Paint
- Outdoor String Lights
- Hanging Bats
- Pumpkin Buckets
Step #1: Cut a Long Branch for Your Halloween Tree
The trees in my yard are still small and young, so I made a trip to my parents’ house in search of the perfect branch to make my Halloween tree. With their permission, I found just the right one and brought it home. I trimmed off some of the smaller branches and leaves to shape it exactly how I wanted: spindly, spooky, and perfect for Halloween.
One of the things that’s so fun about DIYing decor (as opposed to buying it) is that you can completely customize your creation to your space and preferences. In my case, I wanted the tree to look a little fuller, so I added an extra tree branch on the side using my Dewalt drill/driver.
Step #2: Secure the Tree with a Bucket & Concrete
Next, I put the branch in a 5-gallon bucket and mixed in some fast-setting concrete and water. Hans dug a hole where I wanted the bucket to go, and we placed the bucket inside. It was heavy, so this part was definitely a two-person job.
Step #3: Spray Paint Your Halloween Tree
I spray-painted the tree after it was already upright in the bucket, which meant some branches were a little out of reach when it was time to paint them. On top of that, a little spray paint landed on my freshly painted house. Thankfully, it was nothing a little touch-up paint couldn’t fix. But if you’re doing this project, I’d advise painting everything first! I’d also recommend wearing a mask if you’re doing a lot of painting or priming. This one is my favorite!
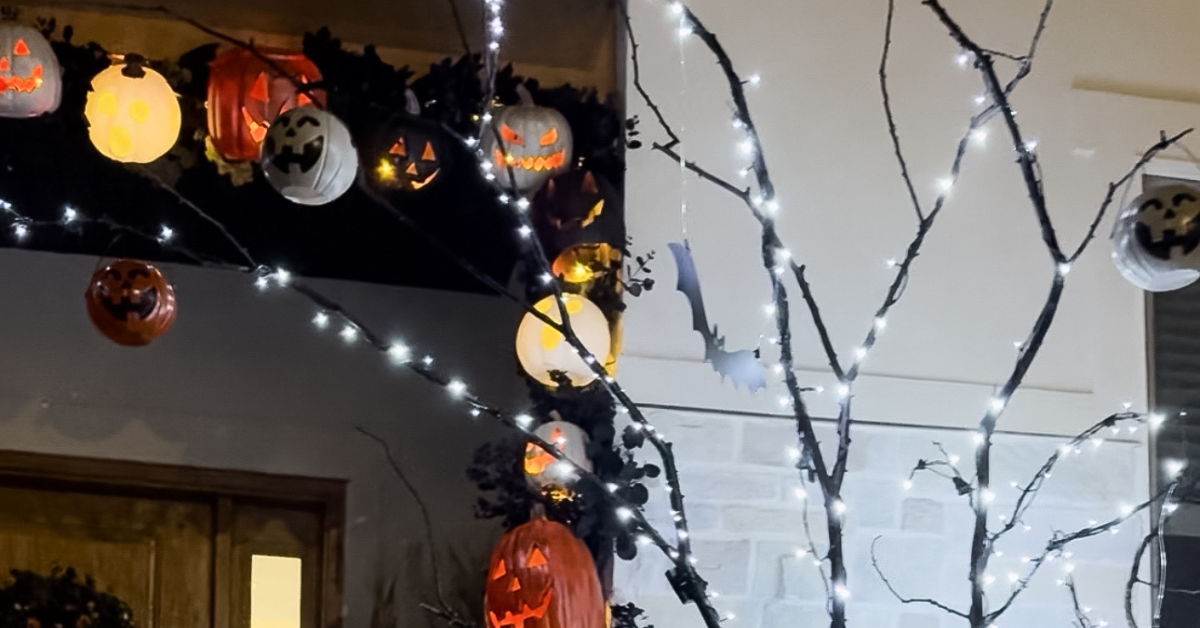
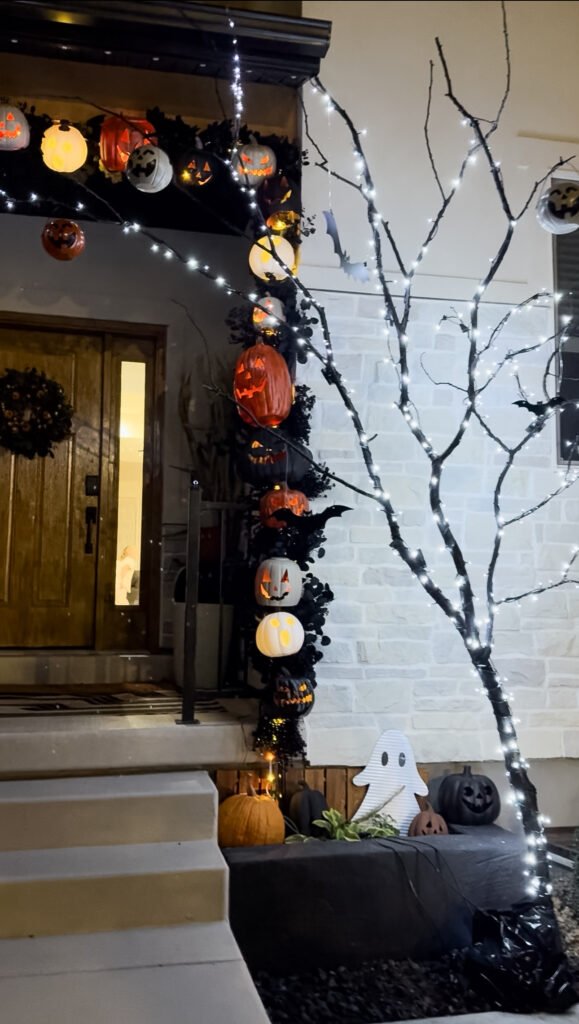
Step #4: Add Lights & Decor
I hung outdoor string lights and bats for extra spookiness. Then I attached pumpkin trick-or-treat buckets to tie my Halloween tree into the nearby pumpkin arch.
All done!
This haunted tree was the perfect finishing touch for my front yard Halloween setup! I’m so happy with how it turned out.
All Things SPetrichHome Halloween
For more fun ideas, check out some of my other Halloween blog posts below. And be sure to follow along on Instagram for all the spooky season fun!
- 10 Frightfully Fun Family Halloween Costume Ideas
- DIY Pirate Ship Display: Spookiness on the High Seas
- How to Build a DIY Pumpkin Arch for Your Front Porch
- Web of Wonder: Crafting an Enormous DIY Yard Spider
- DIY Halloween Village: Create Your Own Spooky City
- Quick & Creative Halloween Porch Idea: Floating Witch Hats
- Spook-tacular DIY: How to Create a Skeleton Yard Display
Follow along for more DIYs and fun at…