Modern French Country Part 2: Over-Grouted Stone
Welcome back to Part 2 of my Modern French Country makeover! This round, I’m focusing on the stone. In Phase 1, it got a fresh coat of paint, and now it’s time to take it a step further. I heard plenty of mixed opinions about over-grouted stone, but honestly, I love the look. And if there’s one thing I’ve learned through years of DIY, it’s that what matters most is creating a home you love.
The over-grout technique gives the stone a lived-in, timeless feel, which is exactly what French country style is all about. To add even more character, I painted a few of the stones for some natural-looking variation. After some trial and error, I finally landed on the look I was after. Keep reading for the painting and over-grouting stone steps that helped bring my vision to life!
Over-Grouted Stone Supplies:
- Grout (Color of Your Choice)
- Drill with Mixing Attachment
- Heavy-Duty Piping Bags
- Work Gloves
- Heavy-Duty Sponge
- Putty Knife
Painted Stone Supplies:
- Paintbrush
- Paint (Color of Your Choice)
Part 1: How to Get the Over-Grouted Stone Look
Step #1: Prep the Grout
The process for over-grouted stone is honestly pretty simple. Just mix up the grout and water with a drill and mixing attachment, and get to work! The packages of grout generally have instructions, but you might still have to experiment with the consistency and grout-to-water ratios. The important thing is that the grout is runny enough to pipe through the masonry piping bags without being too watery. Aim for a spreadable, peanut butter-like consistency.
Step #2: Begin Piping
Start adding the mortar into the cracks between the stones. Some areas might have larger gaps than others, so you’ll need more in those spots.
This process was taking me a while, and I was starting to get a little discouraged at the thought of how much time I’d be spending on this. Thankfully, my family came to lend a hand, and with their help, I was able to wrap up this step much faster than I would have on my own! Check out the video of their commentary below if you need a laugh!
I took this photo when I was halfway done with grouting this area. Look at the difference it makes!

Step #3: Smooth Out the Grout
Let the grout begin to dry. Since I was outside, it only took a few minutes for it to begin to set. After it’s hardened a little, I smoothed it out by spreading the grout through the cracks with my gloved hands. I also used a putty knife in some places. Then I used a heavy-duty sponge to buff and pull some of the grout over the surface of the stone, which gave everything a more leveled look.
After letting it set for a couple of days, it was time to move on to Part 2: painting!
Part 2: Adding Character with Paint
Because the stone had been whitewashed during the first phase of our exterior makeover, the color variations were more muted than I wanted them to be. To bring back that natural variation, I knew I’d have to paint the stones. I started by painting pieces of paper and placing them in different areas so I could visualize how it would look.
Then, I started painting! But my first attempt didn’t go as I’d hoped…
So I power-washed the stone and started again. Luckily, my second go was a success! At my mom’s suggestion, I watered down the paint for a more distressed, lived-in look. Then, I used a foam craft brush to apply the color. Once that coat was dry, I stippled on an additional layer of color with a sponge. This technique was key in creating the natural look I was going for!
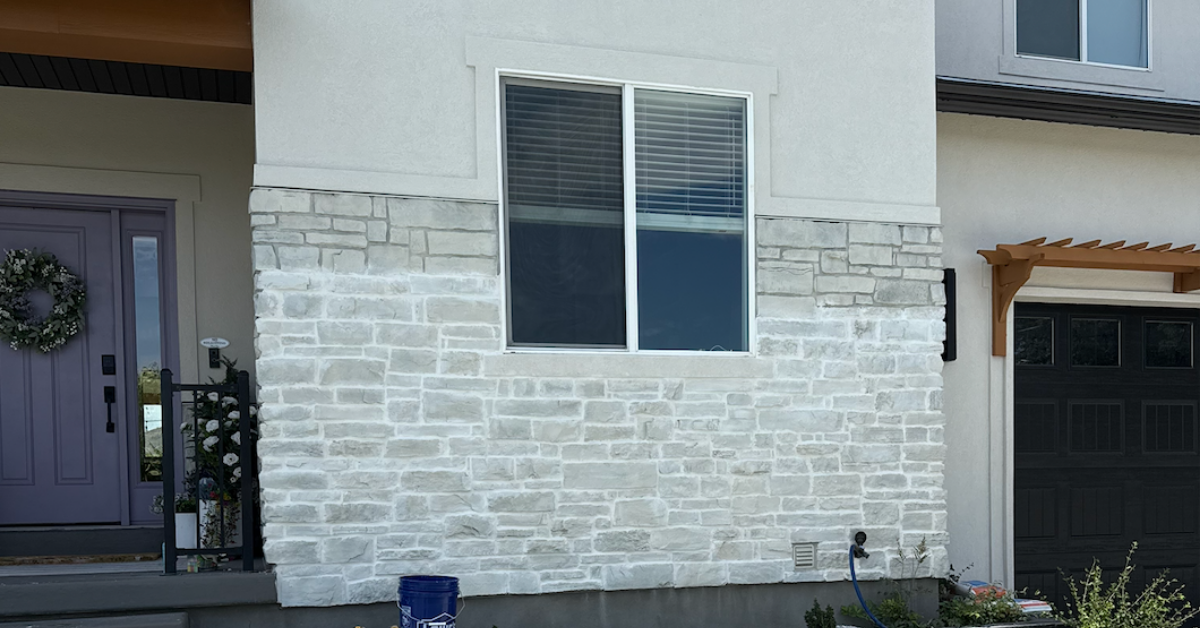
Over-Grouted Stone Results
I couldn’t be happier with how the stone turned out and the way it adds rustic warmth to our Modern French Country makeover. But it isn’t complete yet! Next, I’m tackling painting the porch and walkway.
Follow along for more DIYs and fun at…