
Garage Makeover Part 2: Garage Storage Shelf
My first organizational project of this makeover: the garage storage shelf! If you missed part one of the Garage Makeover, click HERE.
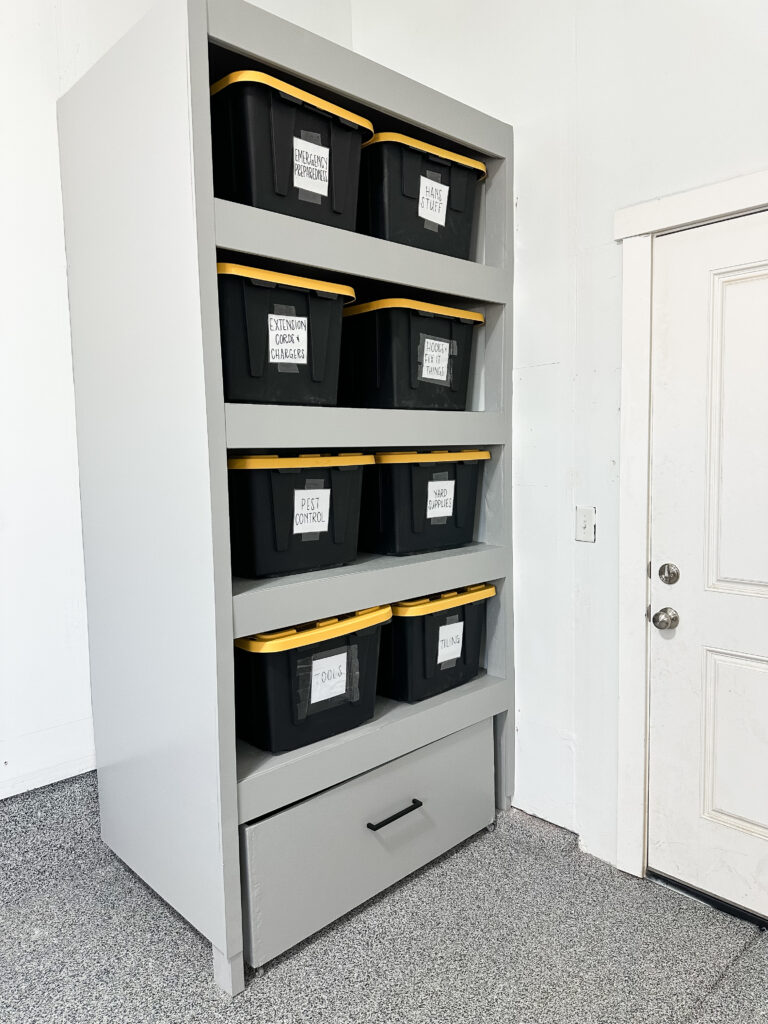
The secret to organization is keeping everything hidden and easily accessible. Just kidding, I don’t know if that is the secret, but it sounds good and works for me. This storage unit is the best of both worlds. What I love about DIY is that I can create whatever I’m doing exactly as I want. I measured and built the shelves to fit two bins on each shelf, which made them super easy to get to. I labeled the bins so even though I can’t see through them, I still know exactly what is in each one. This tutorial will guide you through the process of building the shelving unit.
Note: This post contains affiliate links. I may earn a commission at no extra cost to you. Thanks for supporting my content! 🙂
Garage Storage Shelf Supplies:
- Storage Bins
- Screws
- Drill/Driver
- 2x4s
- Level
- Pocket Hole Jig
- Plywood
- Spackle
- Sanding Sponge
- Primer
- Wheels (for Drawer)
- Hardware
- Labels
Step #1: Measure the Storage Space
Before you get started, decide what you are putting on the shelf. As I said before, I got THESE bins, and wanted them to be side by side on each shelf. I didn’t want a bunch of wasted space, so I made each shelf slightly larger than the two bins.
Step #2: Install Support Braces
These shelves will need to hold a lot of weight. Using 3-inch screws, I started by installing 2x4s to the studs in the wall on both the back and side of the shelf. I made sure they were level and even all the way up.
Step #3: Add Shelves
I started on the bottom shelf first. Using more 2x4s and pocket holes, I finished the frame of each shelf. One 2×4 on the side, extending from the back brace to the front corner, and one across the front. Next, I installed 2 vertical 2x4s on the bottom of the shelf to the floor, in both front corners, to act as additional supports.
Then, I took a sheet of plywood, cut it to the exact dimensions, and placed it on top of the 2×4 supports. I screwed through the top of the plywood into the 2x4s.
After repeating this for each additional shelf, I installed the vertical supports into the shelf below it.
Step #4: Make Your Garage Storage Shelf Pretty

This step is probably unnecessary. After all, this is a garage. However, I couldn’t skip this step, because I was not about to do all this work and have it not look pretty. What is the point of that?
I took another sheet of plywood and installed it on the side of the shelving unit. Then, I took trim pieces and trimmed out all 2x4s on the front. I filled all the holes with spackle, and then gave everything on it a quick sanding.
Step #5: Prime & Paint
I say this whenever painting raw wood: It is so important that you prime raw wood first. Raw wood sucks up the primer/paint so much, which results in you needing a couple of coats. Primer is much cheaper than a paint/primer combo. It will save you money to prime it first, THEN paint it—which is what I did. I used my favorite primer – BIN. Once that was dry, I sanded it with a 220-grit sanding sponge. Sanding it gives the paint a smooth surface to sit on. I then painted the unit and let it dry.
Step #6: Add a Drawer on Wheels
On the bottom, I built a drawer on wheels. Basically, it’s just a box without a top, with some added wheels. After priming, painting, and installing hardware, I had a drawer on wheels! I think that was my favorite part of this build!
Step #7: Add Bins & Admiring Your Finished Garage Storage Shelf
Time to organize all your stuff in the bins and add your labels. Put the bins on the shelves and you are done! I seriously love how this shelving unit turned out!
Garage Storage Shelf Reveal!
Follow along for more DIYs and fun at…


One Comment
Comments are closed.