Modern French Country Part 3: Concrete Stain & Faux Wood Door
If you’ve been following along on my Modern French Country makeover, you know that I’ve been working on updating my home’s exterior for a few months now! Breaking big projects down into smaller, more manageable pieces is great life advice, and it rings true for DIYing, too. Now we’re in the home stretch of this makeover, and in this phase, I’m staining the concrete patio and walkway and creating a faux wood door. Keep reading to learn how I did these beginner-friendly DIY projects and how you can too!
Note: This post contains affiliate links. I may earn a commission at no extra cost to you. Thanks for supporting my content! 🙂
Part 1: Stained Concrete Patio & Walkway
Painted Concrete Supplies:
- Pressure Washer (Or a powerful hose attachment)
- Concrete Stain (I chose Versatile Gray by Sherwin-Williams, but I also love this option from Amazon!)
- Paint Roller
- Paintbrush
- Optional: Putty Knife
Prep Work
Unless you started with painted concrete like I did, you’ll be able to skip some of the prep work! Because I painted our walkway and front porch in the past, I had to remove it in order to have a clean slate for the new stain color. Finding the best way to remove the existing paint took some trial and error, but eventually, I landed on a solution that worked: A new pressure washer tip.
Once I had that, pressure washing the concrete to clear off the old paint was much more effective. It still took some time, but it was a necessary step! And I would have pressure-washed the concrete even if it wasn’t already painted, just to have it nice and clean before staining.
On the plus side, it was super satisfying to see the previous paint color chip away as I power-washed it. There were some places where the paint was really holding on, so I scraped those areas off with a putty knife.
How to Stain Concrete
Once I had a fresh canvas, it was time to stain! I chose stain over paint this time around for a few reasons:
- Stain won’t peel; it just fades over time (hooray for low maintenance!).
- It keeps the natural texture of the concrete.
- Some stains (like the one I got) are specially formulated to be outside. They are much more resilient to inclement weather, high traffic, and other elements—a must-have for our walkway and patio!
Rolling the stain onto the concrete was pretty relaxing, and I was able to wrap up the front porch quickly. I did some touch-ups around the corners and other detail work with a regular paintbrush, and then it was onto the walkway!
After completing both areas, I added another coat to both the patio and walkway for extra durability. Watch the video below to see how it turned out!
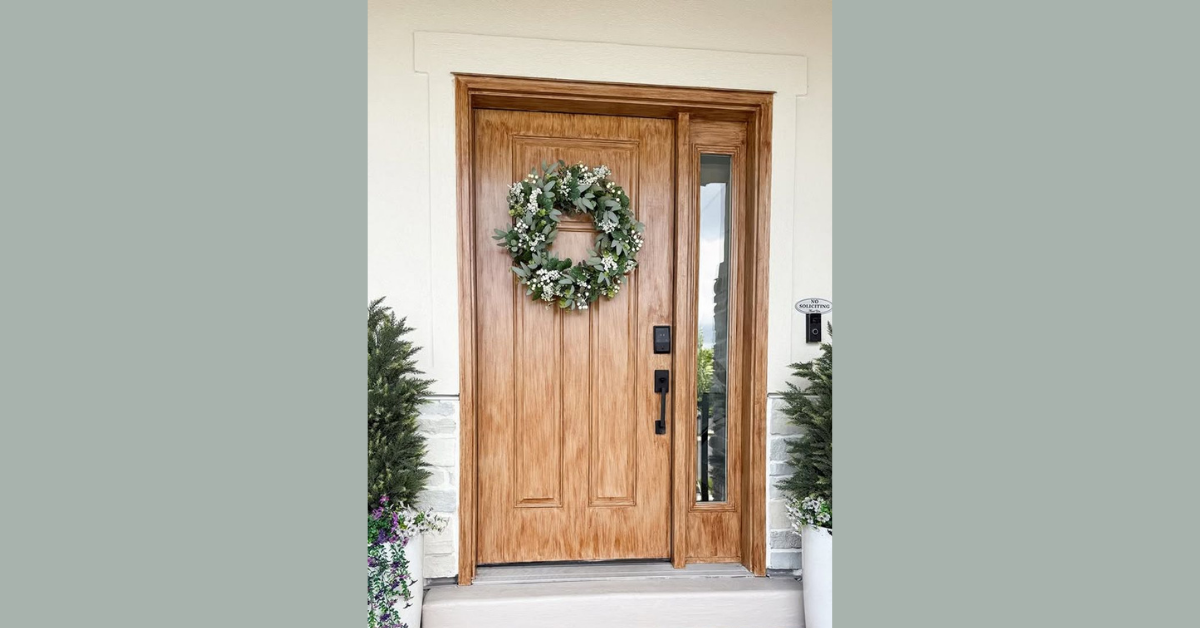
Part 2: Faux Wood Door
Faux Wood Door Supplies:
- Paint (I chose Latte by Sherwin-Williams. Here’s a similar option on Amazon!))
- Paintbrush
- Gel Stain (I used Golden Pecan, the same color as the planter fence)
- Polyurethane
Prep Work
Just like with the concrete stain, I wanted to start with a clean surface. I wiped down the door with a wet microfiber cloth before starting to paint.
Faux Wood Door Step #1
Normally, it would be best to use a paint sprayer for a better finish. But because I was putting a gel stain over the paint, I didn’t think that was necessary and used a paintbrush.
From the moment I started painting the door, I knew this would be a “trust the process” kind of situation. 😂 And Hans also had to trust the process—here’s his face when I showed him how it looked after the paint:

Don’t worry, the door color above is just the base! What’s really going to make it look like a faux wood door is the gel stain.
Faux Wood Door Step #2
Once I started painting on the stain, I was immediately impressed with how similar it looked to real wood! I also think the paintbrush I used helped with achieving that wood-like texture. After the initial coat was dry, I added another. Then, I painted a coat of polyurethane on top to seal and protect that gorgeous stain.
Lastly, I removed the paint and stain I’d gotten on the window with a scraper, then added some updated decor (links below!).


Faux Wood Door Reveal
At last, my faux wood door was done! Check out the video to see the full process and reveal.
Would you try any of these DIY curb appeal projects? Let me know in the comments!
Follow along for more DIYs and fun at…